Tell me if you can relate to this: you are transferring some very important files using your USB on your laptop or desktop computer. You patiently watch the file transfer window and count down the minutes as they slowly disappear on the screen. You are in a hurry, but you are at the mercy of the speed of your USB and the size of the files. Right about now you are thinking it might have been a good idea to zip some of those files but it’s already too late for that.
You are so far into this transfer that starting over would just set you that much further back in completing this major project that has a tight deadline attached to it. You could go an make yourself a cup of coffee and check back later, but you are too invested in watching the time left to transfer as it means you are getting that much closer to getting that job off of your “to-do” list and moving on to other projects.
You’ve been there, right?
You’ve probably done this a time or two as well: barely a fraction of a second after the transfer completes you rip the USB out of your computer and get to work on those files you were moving to this computer. It all works out, you get the project finished in time, everyone praises you and your team and you can relax a bit the following day.
But when the following day arrives, you realize that you need to use that USB for another – much smaller – transfer. So you jam it into the computer’s USB port and you get the dreaded error message telling you that “the drive needs to be formatted” before you can use it. You try another computer with the same results.
Hey, you are not alone.
It has happened to me as well.
But there is a silver lining here. Thanks to Windows 10, they have completely removed the “safely remove USB” feature altogether – by default.
This change went into effect with the deployment of Windows 10 version 1809, which was part of the October 2018 update. If you are one of those computer users who has your operating system automatically updated, this feature was installed and you probably didn’t even know about it until just now. It is also interesting to note that along with this particular update came a slight drop in performance. You may not have noticed it, but it is there.
So, what exactly does a slight drop in performance really mean?
There is a bit of a twist to the answer. That’s because it has everything to do with caching. With the removal of the feature, the data Windows won’t cache disk write. This means that when you wish to move that data to an external device, it may take a little longer to transfer.
I know right… as if data transfers weren’t already long enough at times.
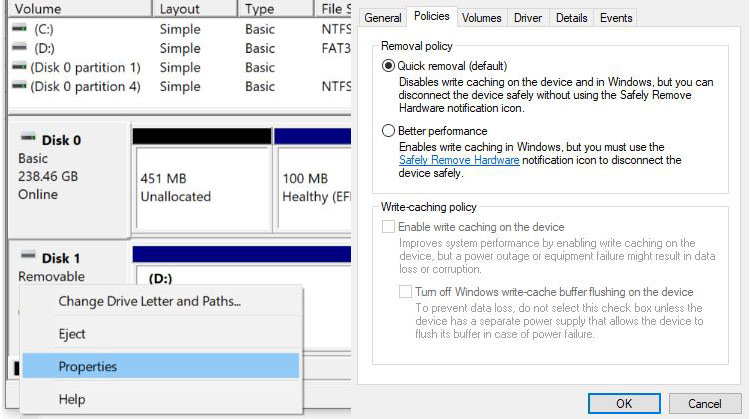
But that’s not the only twist. You can actually tweak things up a little manually by changing the setting to Better Performance.
Here’s how you do that:
Step 1
Connect the external device to your computer
Step 2
Right-click on Start
Step 3
Click on File Explorer
Step 4
Find the letter or label associated with the device
Step 5
Right-click on Start again
Step 6
Go to Disk Management
Step 7
Find the required device, right-click and select “Properties”
Step 8
Scroll to “Policies” and choose either Better Performance or Quick Removal
And you are done!
