
So you’ve decided to sell your Mac but you don’t want nosy people recovering your data. Or possibly, you happen to have some data on the drive that you are not all that proud of and just don’t want anyone to find or recover it. Well, there are actually ways to delete that data from your Mac for good.
Simply formatting or erasing the disk on a Mac is not going to do the trick. Any data recovery software will be able to recover the files, provided they were not overwritten by something else.
Securely Erase External or Internal HDD Without OS Installed On It
Alright. If you intend to erase the regular external HDD (not the SSD), you do not have to restart your Mac. All you need to do is open the Disk Utility program and continue with the following steps:
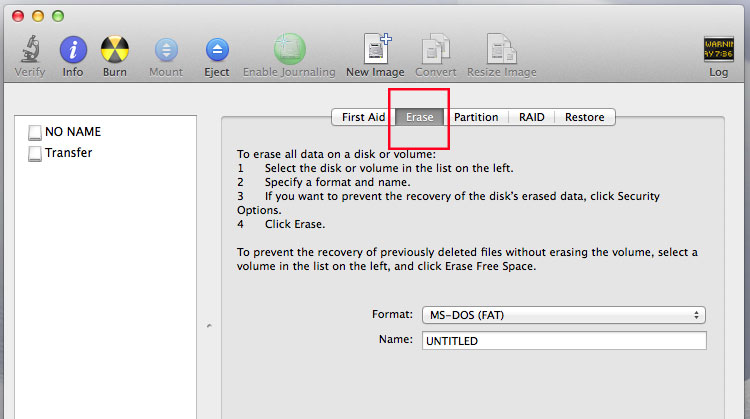
1. Select the disk you wish to erase by clicking on it in the sidebar
2. Click on Erase
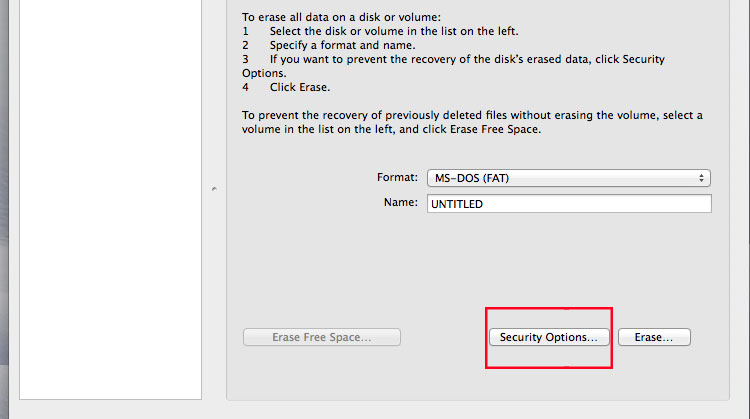
3. Click the Security Options button
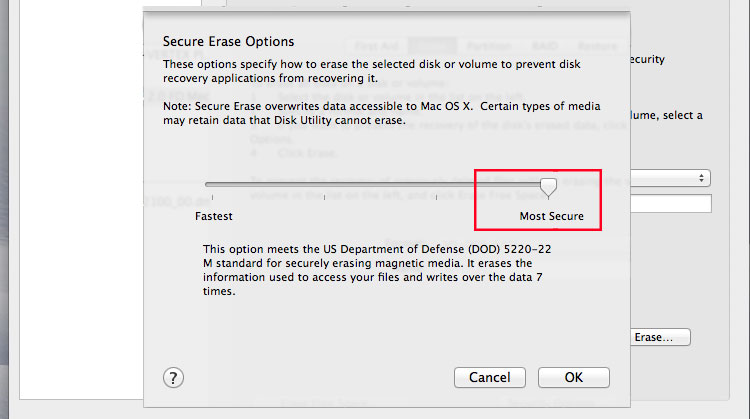
4. Slide the slider that enables you to determine the thoroughness of the erasure of the hard drive over to the final option. In other words, slide it to the far end on the right-hand side. The most secure option will erase data and then proceed to write 0’s on the surface a total of 7 consecutive times. It may take some time to complete the entire process, so be prepared.
5. Click Erase and wait. Maybe find something else to do for a while and then come back and check the progress.
After the process is complete, your drive will only have 0’s present. Not even the most sophisticated of data recovery companies will be able to recover the files.
Securely Erase Internal HDD with Mac OS Installed On It
In case you are trying to completely erase the internal Mac hard drive, you will need access to OS X Recovery. It is a feature that has been added to Macs since about Lion OS X 10.7.
1. Restart your Mac
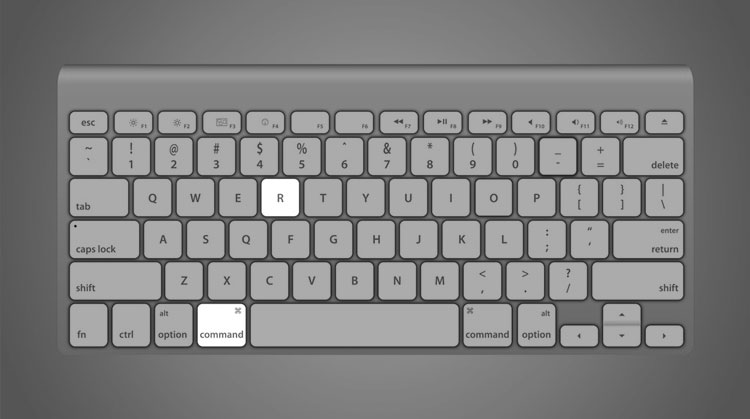
2. When restarting, quickly press down and hold together the Command + R keys. Wait until the Apple logo appears.
3. Select Disk Utility and follow the steps listed above.
Voila! Your disk will be wiped clean with data unrecoverable.
Securely Erase SSD
Before I get to walking you through the process to securely erase your SSD, there are a few factors to keep in mind about Solid State Drives as well as hidden features.
Most all modern SSD drives have this one particular feature integrated into them. It is called TRIM. Without a long and involved explanation, TRIM will completely wipe your SSD after you have deleted files from it. TRIM will immediately wipe the blocks where the files were stored. This basically means that the next time the OS attempts to write new data in that area, it does not have to wait first to delete it.
How Do You Know If Your SSD Has The TRIM Feature Enabled Or Not?
That’s an easy one. You just have to click the Apple menu while holding down the Option key on your keyboard and access System Information.
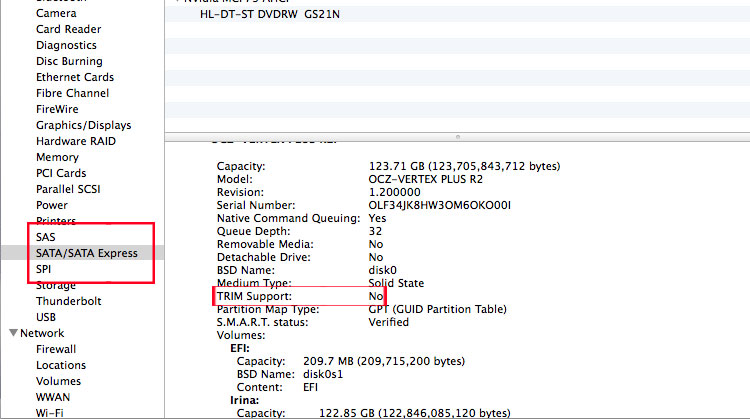
Find the SATA section in the menu and then locate the hard drive you wish to enable with TRIM. In the description, you will see a line that will indicate if TRIM support is present or not. If you see the word ‘Yes’ then your drive is TRIM enabled. Otherwise, it is not.
If for some reason it is not enabled, and you want it to be, there is a free software program available that will assist with doing it. You can find it here.
What this means is that you won’t really have to go through the hassle of waiting for the Disk Utility to finish its erasing job. TRIM wipes it for you for good immediately.
Don’t just go by what I’m telling you here. Go ahead take a TRIM enabled SSD and delete something you don’t need and try to recover that with data recovery software of your choice.
There Are Exceptions With SSD and TRIM, When SSD Cannot Support TRIM.
1. SSD is old and simply does not support TRIM
2. If your SSD runs older versions of Windows including 95, 98 and XP
3. If your SSD runs older OSX, anything up to 10.6.8
4. Your SSD is encrypted
5. Your SSD file system is FAT32
If TRIM is not available, or you just want peace of mind that no one will be able to recover the data on your SSD, follow these steps:
1. Restart your Mac
2. Boot into recovery partition by holding down the Command + R keys
3. Select Terminal from the list
As soon as Terminal opens, type the following:
diskutil secureErase freespace 4 /Volumes/YOURDRIVE
You will need to change YOURDRIVE to the name of your hard drive. That should be visible for you in the Disk Utility disk list.
Because it is an SSD, wiping it will be faster. Or at least, not as long as running it on a regular HDD.
Your SDD is securely erased.
What If I Want To Securely Erase Just A Single File Or Folder From A Hard Drive?
No problem. This can be done with the help of CCleaner. Here is a quick tutorial directly from their website.
Basically, it will delete the file and then rewrite that spot where the file or folder was located with OS. CCleaner for Mac has three methods it will use for secure deletion. There’s the Simple Overwrite (1 pass), Medium Overwrite (7 passes) and the Complex Overwrite (35 passes).
No data recovery software or hardware will be able to recover files that have had this process done to them. The file system may keep the records of those files, but the files will be obsolete or corrupt. A fast HEX editor check will reveal nothing but 0’s.
In conclusion, security means a lot to everyone. Preventing your data from ending up in the wrong hands should be a priority. This is particularly true with identity theft becoming as large an issue as it is. Especially with the dark web becoming such a popular place for cybercriminals.
